Wednesday, August 4, 2010

Mamas-Cows Double Page Layout

Here is a completed page using yesterday's 12x12 page. I added photos, made a rope, which I layered from the left page to the right page and added a sheriff's badge. One of the things I like to see is overlapping from left to right. If you go into the center of the album (the right side of the left page or vice versa) you really should continue it onto the other page. Otherwise it ends up looking as if it fell into the book somewhere. Exception: If you have if fall off the other sides (the left side of the left page & the right side of the right page), there you can get away with having a portion of your subject. Makes it look like a snapshot of something more.
Would love to see what you come up with!

Tuesday, August 3, 2010

Mamas don't let your boys grow up to be Cows

Here is 12 x 12 scrapbook paper made from the Art Creations Friday challenge. I thought I'd share how you can take one thing and turn it into something a bit different. Check on my other blog to see what the challenge was. Tomorrow I'll show you how the background can look without the boy & rider. I like this background. I can imagine really cute coordinates with it! Can't wait to make them.
Happy Trails!

Monday, August 2, 2010

Confetti paper

Coordinates to go with the candle paper and candle decoration. Every party needs confetti. Here is a sample of the paper and how I used it with the previous party page.
Take a close look at the confetti. It is the ribbon from the tag. Each ribbon was copied and warped. Repeating this until the amount was what I was looking for. Then scaled down by 1/4th, copied three times and moved each new layer over to a corner to make one large square. When moving, I also rotated them in a different direction to keep the confetti looking the same in each quadrant. I left one layer with the original size. Erased some that looked odd and next added dots. Voila!
Now, go have a party.

Sunday, August 1, 2010

Birthday Tag

Birthdays come but once a year - grab that glass and say that cheer!
Here are instructions for this birthday tag shown here and on my other blog.
Instructions are for photoshop C4 and traditional scrap bookers.
Feel free to double click on each square to be able to read easier.
(And please excuse any mis-spellings!)

Friday, July 30, 2010

Make a Wish Paper

Here is some of my new 12x12 paper for birthdays.
The first one is antiqued and the second with a linen background.
The candle makes for a great addition to your page.

In traditional scrapbooking, I like using the antiqued paper for old photos that have slightly lost their luster. Sometimes it's nice to have the photos somewhat faded, however, if you have scanned them into photoshop, you can restore the photos and make them look new again.
With digital scrapbooking, either one of these pages can be made more vibrant and/or change the hues. Digital gives you many more options in color, texture, and even dimension.
To purchase- please leave me a request in the comment section.
Hope all your wishes come true!

Monday, May 10, 2010

Blue Striped Paper

I thought I would post a new scrapbook paper that I designed.
Love to hear your thoughts on it.
This is how I used it. You can see that I added black antique on the sides.
It can be used many ways and is a subtle addition to any page!

Wednesday, February 24, 2010

Be Different Tag

Here is a tag for a scrapbook page. It was made with five different sheets of card stock. I first cut the center pink rectangle. The added the red stripe at the bottom, and then another section, the dot paper. Each was cut for a 3 inch width. Adhere together. Using an antique brown stamp pad, rub the corners to give it an aged look. Next back this new rectangle with the green. Adhere once again. Use push pin brackets on each corner. Use a flourish rubber stamp shape and stamp with the same antique brown color onto the rectangle. For the flower, use a square piece of the lighter deco pink paper, cut into the center (but not all the way) and then angle back out, almost cutting a triangle shape. Just as you get back to the side of the paper, curve it back in, redirecting back into the center. Keep doing this all the way around and you'll then have a flower shape. Adhere this to another piece of red paper, cut around your flower, leaving a small border of red. It doesn't have to be perfect, the more irregular the shape, the more it looks whimsical. Next with your polka dot papers scraps, cut one of the dots out for the center of the flower. Before you attach it, use the stamp pad to antique around it. Then attach. Next cut your leaves. These are with green and the easiest way is to cut three individual leaves using scraps. Curving one side, turning the paper and curving the other side. Use the stamp pad to antique these too and adhere to the back of the flower, just showing a portion of the leaf. Attach the completed flower onto the tag. You can repeat the flower process to make small ones if you like. Last, you can add wording, whether by stamping, stickers, or handwriting. Enjoy!

Thursday, February 18, 2010

Go Bold or Go Home!

With all the snow that everyone has been having I thought I'd show you a scrapbook page layout you can view. Thanks to DebMelmon Illustration for the background paper. Check her out at: http://www.debmelmonstudio.com/.
One tip on adding photos into a page with bright, bold backgrounds, is to keep your photos on the larger scale, keep colors within the same hues and range, and place the colors opposite from each other. Example, the yellows in the background are offset by the yellow in the bottom two photos. Also, the pinks were used to back two of the photos and by adding the pink ski on the side, you'll have balance in the page. Also, note that I DON'T back the photo that has the pink ski glasses with pink paper. This is a common occurrence that I see in scrap booking. By not doing that, you'll keep more balance, versus having the color overstated.

Hope these tips help and feel free to leave comments or ask questions! Thanks for stopping by.

Thursday, January 14, 2010

One Great Shot?

Putting photos in your scrapbook can be as easy as placing them on the page, or in the digital world, placing, merging, and grouping. But how many times have you had a great photo and thought that it would make a wonderful background?The above photo of the grass was used in this next layout. It was taken at a high pixel/high resolution rate so that it can easily be enlarged to a traditional scrapbook size of 12x12 or used in a digital layout without loosing any of the quality.

For a 4 x 6 originating size to be enlarged to a 12 x12, a portion of the sides will be cut off, however in the case below the photo was copied then pasted. The copied photo was cropped down to just show the right side portion of the mountain. Therefore, it went from a 12 x 18 down to a 12 x 2, then pushed in (squished in) to make it look slightly different and at the correct width. Placed on the right side of the photo collage, it appears as if it is just an extention of the photo on the left.
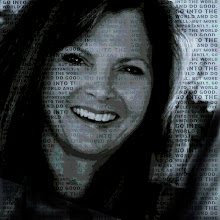
The to use it as a backdrop for wording or a story, take the photo and lighten it so it just gives the illusion of it. You can see how both upper and lower layouts are the same, just depends on what you want to highlight. The above is highlighting the waterfall, below is highlighting the story.